
How to Remove Water Stains from Wood in Your Home

A water ring appears on a coffee table after a storm, a damp planter leaves a dark outline on a sideboard, or condensation marks the wood during a humid afternoon in Fairhope. The first instinct is usually to grab vinegar, baking soda, mayonnaise, or an iron. That can make a manageable finish mark worse, especially on older furniture, veneer, or a coating you can't identify.
The safest way to learn how to remove water stains from wood is to diagnose the mark before choosing a product. Sweet Home Cleaning Service works around the realities of Eastern Shore homes, where Gulf Coast humidity, wet décor, beach sand, and storm cleanup can all affect wood differently. A careful response protects the original finish instead of treating every stain as if it were the same.
Table of Contents
The First Step Is Diagnosis, Not a Product
A coffee table in an older Fairhope home may show a pale ring after a glass sits on it during heavy rain. Across the room, a darker mark near a window may have developed slowly from condensation. Both are called water stains, but they don't necessarily need the same treatment.
Start by removing the moisture source and lifting any liquid with a clean, white absorbent cloth. Don't rub. Rubbing can spread residue and abrade a softened finish. Photograph the mark, note its color and boundary, and check whether the surface feels swollen, soft, tacky, or uneven.
Read the finish before you clean
Wood may be protected by polyurethane, lacquer, wax, shellac, paint, oil, or no finish at all. A method that seems harmless on a durable water-resistant coating can cloud lacquer or disturb an aged wax surface. The Western Australian Museum recommends dry cleaning for wooden objects because wood and many finishes are moisture-sensitive. For water-resistant finishes such as wax or polyurethane, its guidance permits only a slightly moistened sponge, with no water left on the surface, and it warns against wet cleaning polished wood. See its collections care guidance for wooden objects before working on an unfamiliar or valuable piece.
Inspect seams, veneer edges, joints, drawers, and the underside. A ring confined to the top may be cosmetic, while moisture in an edge or joint can point to a larger problem. If you're unsure whether the damage is recent or older, this guide to spot old vs new water damage offers useful visual context.
Practical rule: Stabilize the wood first. Choose a treatment only after the surface is dry and the finish has been identified as far as possible.
For everyday care ideas that apply beyond one damaged table, use these cleaning tips. A one-size-fits-all wet-cleaning method is risky because removing a stain can also remove original wood, finish, or patina.
White Rings Versus Dark Stains on Finished Wood
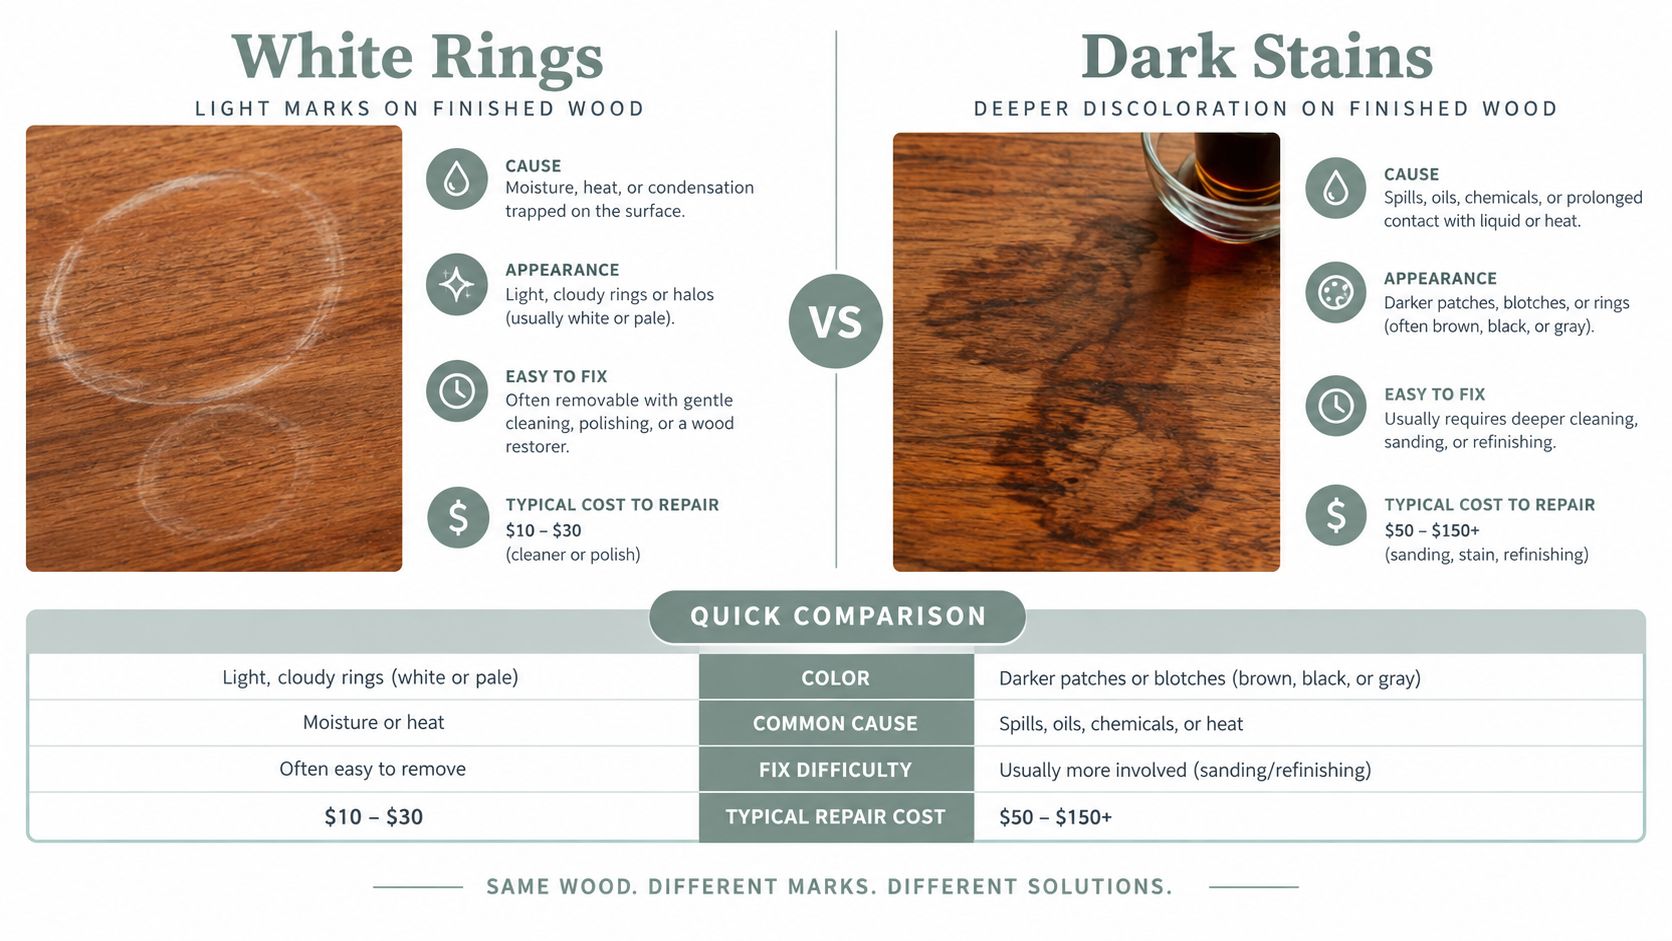
Color is one of the most useful clues. White or cloudy rings generally indicate moisture trapped in or beneath the finish, while dark gray, brown, or black marks are more likely to reflect moisture that reached the wood fibers or caused chemical discoloration. That distinction changes the repair path.
What a white ring usually means
A white ring often looks cloudy, milky, or slightly hazy. The wood beneath may still feel firm and smooth, and the mark may follow the base of a cold glass or dish. Because the discoloration is often in the finish layer, gradual drying and a carefully tested surface treatment may improve it.
That doesn't make heat or rubbing automatically safe. Older shellac, lacquer, and unknown coatings can soften, haze, or change sheen quickly. Work in a small hidden area first, and stop if the finish becomes tacky, lighter, uneven, or distorted.
What a dark mark demands
A dark tide line or black stain suggests deeper penetration or chemical change. Scrubbing it with an abrasive powder won't pull moisture out of the wood. It may instead remove surrounding finish and create a larger patch that needs color matching and refinishing.
In Gulf Shores and Orange Beach, humid air can slow drying and encourage repeated moisture exposure from wet décor, plant pots, damp packaging, or tracked-in storm water. Wood also moves as its moisture condition changes, so a damaged veneer or joint deserves more caution than a recent surface ring. Care principles for exposed wood also apply to worktops, and guidance on maintaining butcher block countertops is a useful reminder that wood care depends on the material and finish.
Before cosmetic work, measure moisture if the stain followed a leak, flood, or persistent dampness. Building-science guidance identifies 19% moisture content or less as a dry target before enclosure, while sustained readings above 20% create conditions favorable to fungal decay and mold growth. See the PNNL guidance on visible signs of water damage or mold. A dry reading doesn't guarantee that discoloration will disappear, but it tells you whether continued drying and monitoring come before stain treatment.
Gentle Methods for Surface Water Marks
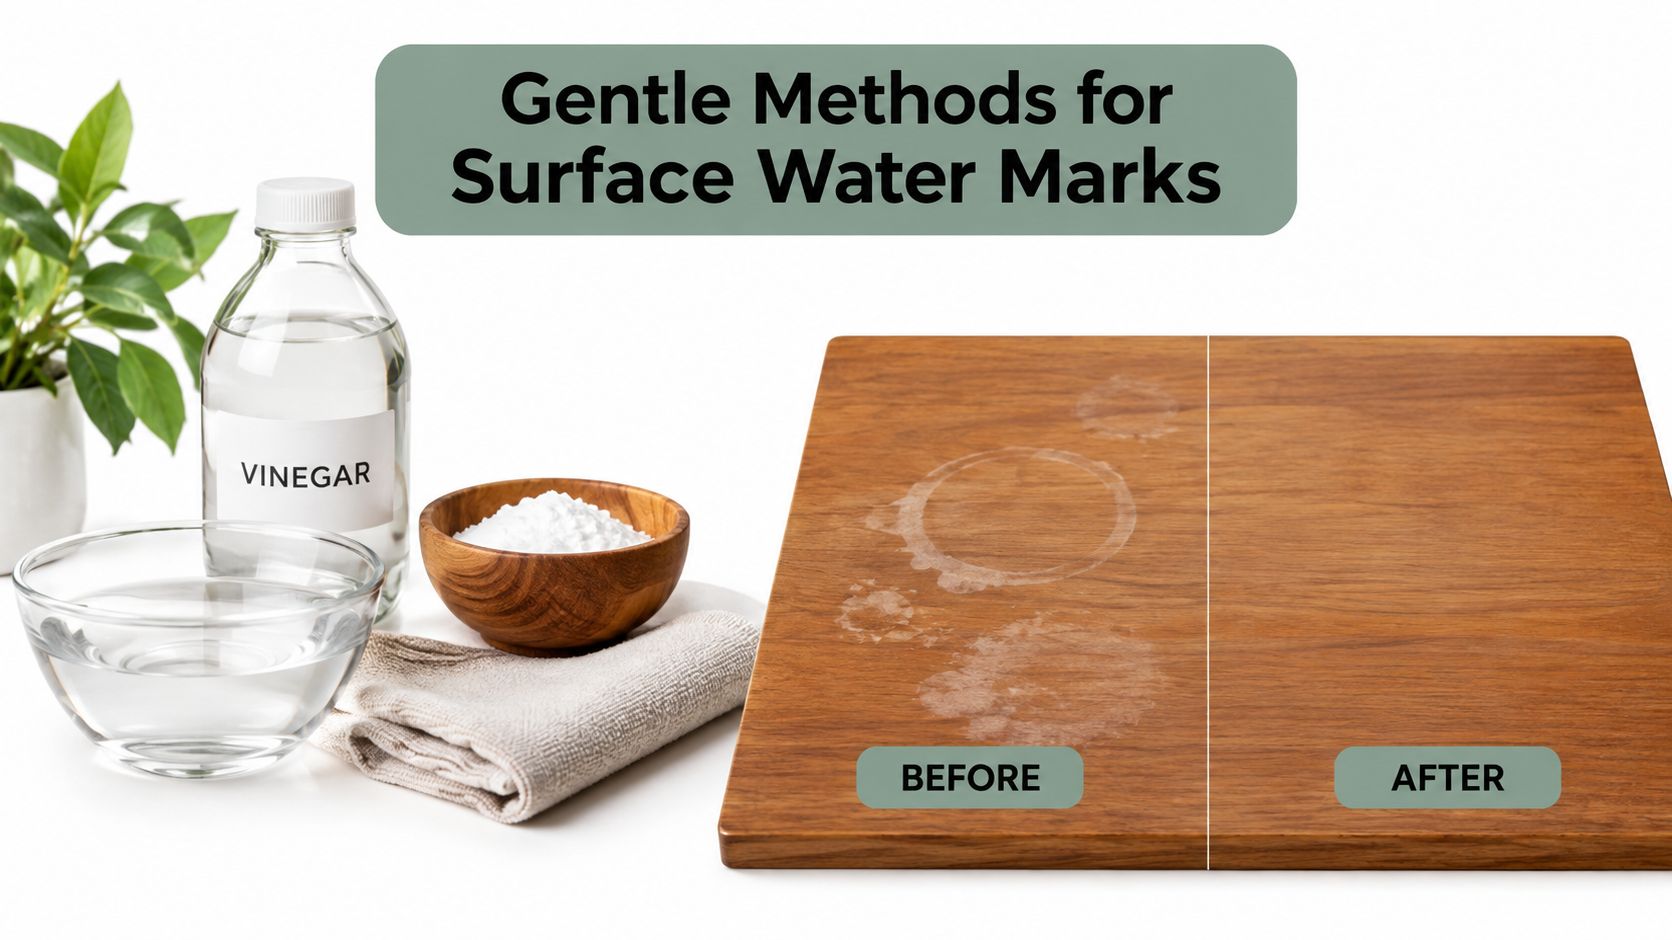
Once a superficial white ring has dried and the finish remains stable, use the least aggressive approach that fits the surface. The goal isn't to heat the wood, scrub away the mark, or saturate the coating. The goal is to encourage trapped moisture in the finish to disperse without changing the finish itself.
Begin with a controlled test
Choose an inconspicuous spot under the table, inside a drawer, or along the back edge. Use a clean white cloth so dye doesn't transfer, and keep moisture to a minimum. Don't polish, cover, or seal the area while it still feels damp or smells musty.
A commonly reported consumer technique uses a clean white cloth over the mark and an iron on its lowest setting for approximately 15 to 20 seconds, kept moving continuously. The WoodWorks guidance describes this as controlled evaporation, not direct heating of the wood. Stop at once if the finish turns tacky, hazy, discolored, or distorted. Read its mass timber moisture management guidance for the underlying caution about moisture and finish behavior.
This method isn't appropriate for every coating. Don't use it on an unknown surface just because the mark looks white. If the test area changes, stop and choose professional assessment instead.
Consider a surface treatment for a persistent ring
For a mark that remains at the finish level, apply a very small amount of petroleum jelly or mayonnaise with a microfiber cloth, working lightly rather than scrubbing. These substances can temporarily saturate the finish and help disperse the cloudy appearance. For a persistent mark, the treatment may be left overnight, then removed completely.
This approach won't repair a dark penetration stain, swollen veneer, missing finish, or chemically altered wood. It can also leave an oily or food-based film that attracts dust and complicates later refinishing, so wipe the surface thoroughly after the test. Don't mix remedies or add vinegar, peroxide, chlorine bleach, abrasive powder, or an untested solvent.
Stop immediately if the surface becomes cloudy, sticky, lighter, darker, or uneven. A small ring is easier to live with than a damaged finish that now needs refinishing.
After treatment, wipe away residue with a dry, soft cloth. Keep the piece away from direct sun, radiators, forced heat, strong dehumidifier airflow, and sealed plastic covers. Rapid or uneven drying can stress the finish, lift veneer, or cause dimensional movement. For broader household care, these instructions for cleaning a kitchen floor reinforce the same useful habit, match the tool and moisture level to the surface rather than using one formula everywhere.
Why Aggressive DIY Fixes Often Backfire
A dark stain can make sanding feel like the honest solution. Sandpaper removes visible material, so the mark may appear to improve quickly. The trade-off is that sanding also removes the coating, surrounding color, and sometimes the aged patina that gives an older Fairhope or Spanish Fort piece its character.
The Western Australian Museum warns that stain removal can remove original wood, finish, or patina. It recommends considering the options before using sandpaper or a sander and seeking conservator advice for valuable or historically significant objects. That caution matters even more with veneer, where the decorative wood layer may be thin and difficult to replace invisibly. Review its guidance on wood surface treatments before abrading an heirloom.
Avoid chemistry by reputation
“Natural” doesn't mean finish-safe. Mayonnaise, baking soda, vinegar, peroxide, chlorine bleach, and oxalic-acid products each behave differently on wood and coatings. Bleach can lighten the stain and the surrounding wood, creating a pale halo. Oxalic-acid treatment for dark discoloration requires protective equipment, careful residue removal, complete drying, and later refinishing.
Steam and high heat carry their own risks. They can soften a coating, drive moisture into joints, or cause veneer lifting. A sealed plastic cover can trap dampness instead of allowing controlled drying.
Use this short stop list before escalating:
- Skip chlorine bleach and abrasive powders: They can alter color and remove the original coating.
- Don't mix chemicals: Combining products creates an uncontrolled treatment and makes residue harder to identify.
- Don't sand by default: Sanding may remove the mark, but it also removes finish that must be reapplied.
- Avoid direct heat: Radiators, hair dryers held close, steam, and high iron settings can distort wood and finish.
- Don't conceal dampness: Covering or refinishing before drying can trap an active moisture problem.
A professional can test a small area, document the result, and explain whether cleaning, finish removal, bleaching, sanding, or restoration is justified. That slower decision often preserves more of the original piece.
Preventing Water Stains in Humid Coastal Homes
Prevention in Fairhope starts with recognizing how often moisture arrives indirectly. Condensation, wet plant pots, damp packaging, spring pollen carried in on cloths, beach sand, and hurricane-season cleanup can all place water or abrasive grit on finished wood. In a busy Eastern Shore home, a coaster and a dry cloth are more useful than a cabinet full of emergency remedies.
Keep drinks on coasters and place a barrier beneath planters, vases, and anything that may sweat. Dust with a dry, soft cloth so sand and grit aren't dragged across the finish. Open enclosed spaces periodically, check the underside of furniture, and address leaks or condensation before a faint mark becomes a dark boundary.
Build moisture checks into cleaning routines
Vacation rental turnovers in Gulf Shores and Orange Beach move quickly, but a fast surface wipe can miss damp drawer bottoms, table edges, and moisture beneath décor. A careful turnover should include lifting objects, drying the contact area, checking for rings, and reporting swelling or unusual odor rather than covering it with polish.
Older homes and fluctuating indoor climates on the Eastern Shore also benefit from stable conditions and gradual drying. If a piece remains unusually damp, use a moisture meter and investigate the source before refinishing. Typical indoor wood stabilizes around 8% to 14% moisture content, while outdoor wood commonly sits around 12% to 18%, according to the building-science reference linked earlier. Those ranges provide context, but meter readings vary with species, temperature, and meter type.
For broader moisture protection around the exterior, homeowners may also want advice such as trust SuperiorPRO for siding. Inside, the same principle applies: control the source, let materials dry gradually, and avoid cosmetic repairs while dampness continues.
When to Call a Professional for Wood Restoration
A pale ring on a modern, durable finish may be a reasonable small-area test. A dark stain on an antique, lacquered cabinet, veneered table, or piece with an unknown coating is a different responsibility. The more valuable or irreplaceable the furniture, the less sense it makes to experiment with heat, food-based pastes, bleach, or sandpaper.
Call for restoration guidance when the wood feels soft or swollen, veneer edges lift, joints separate, the mark extends underneath the piece, or moisture came from a leak, storm, or flood. Professional help is also appropriate when a finish becomes cloudy or tacky during testing, when a dark stain remains after drying, or when the surface has historic patina that shouldn't be removed casually.
A cleaner can maintain surrounding rooms, remove residue, and document visible concerns, but deep discoloration and finish failure may require a furniture conservator or restoration specialist. In Fairhope, Daphne, Spanish Fort, Gulf Shores, and Orange Beach, that distinction protects both the furniture and the homeowner's expectations. Routine cleaning service in Gulf Shores can support a well-maintained home, while specialized restoration should be assigned to the right professional.
For renters, document the stain and notify the property owner or manager before attempting treatment. For homeowners, photograph the area, record the likely cause, and keep any damaged materials or furniture away from additional moisture until someone can assess it.
Sweet Home Cleaning Service provides standard house cleaning, recurring maid service on weekly, biweekly, or monthly schedules, deep cleaning, move-in/move-out cleaning, and vacation rental cleaning for homes across the Eastern Shore and Gulf Coast. If water marks, storm cleanup, or busy schedules are taking time away from your family, visit Sweet Home Cleaning Service to book service or request a free quote in Fairhope and the surrounding area.

Let us handle the cleaning. Enjoy your home.



Sweet Home Cleaning Service
19940 State HWY 181, Suite E Fairhope, AL 36532
Phone: (251) 586-4081
sales@sweethomecleaningservice.com